How To Pick Your Merch by Amazon T-Shirt Display Color
If I had a dollar for every person who asked me how they could pick the display color of their Amazon Merch shirts within Amazon when they first post, I could probably retire. Over and over again, people come to me with this question and until today I have not really had an answer for them.
How many times have you put up a shirt and the display color is almost always the least attractive option? Some shirts work well on darker colors, while others work on light, but there is often 5 good choices with one being kind of “iffy”. For me, this is almost always the yellow color or light blue. Do not get me wrong, these sell incredibly well, but sometimes you just want that black color showing up first, or red!
On the Merch by Amazon subreddit, user HipsterNipple (great name right?) found out a little hack that you guys might find useful. Below are the steps that you need to take in order to have Amazon display a certain color as the default.
Setting Your Default T-Shirt Color
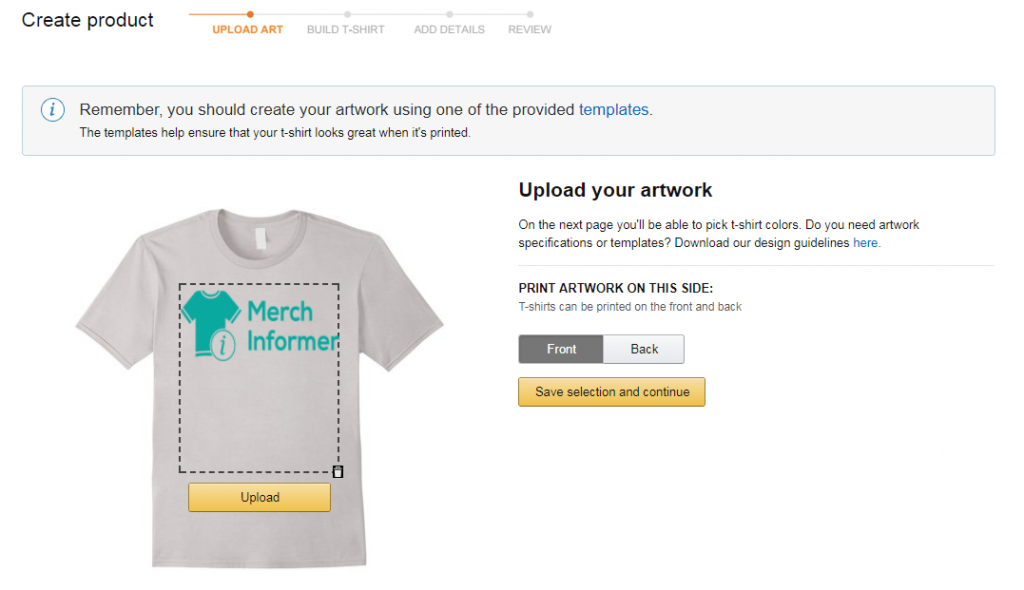
The first step is to upload some artwork. For this example, we are going to use the Merch Informer logo on a shirt.
Click on save and move to the next screen where you will be able to pick the colors.
By default, silver is checked as an option for some reason (often the worst of the colors in my opinion), so we will go and uncheck this. You need to uncheck this for the method to work.
Now, this is where the entire trick comes into play. It depends on how many different color options you are going to pick and in what order you pick them. I should find out how many times this guy/gal had to go back and forth in order to figure this out, but I am glad he did.
- 5 Color Options – The second color you pick is displayed by default
- 4 Color Options – The first color you pick is displayed by default
- 3 Color Options – The first color you pick is displayed by default
- 2 Color Options – The second color you pick is displayed by default
Important: You need to pick colors BEFORE you select the youth size. If you check the box for youth sizes before you do the small hack above, this method will not work.
Once you have selected the colors in the order that you want, go ahead and save the selection and hit continue. That is really all there is to it.
Testing The Method
For testing purposes, let’s say that we want the Asphalt to be the default in search. Here are the steps to take.
- Uncheck Silver
- Select Black
- Select Asphalt
- Select White
- Select Heather Grey
- Select Dark Heather
BAM! That is all you have to do. As you can see from the screenshot below, the default color in search is Asphalt which is the color that we wanted. I have tested this 4-5 times now and it seems to work every time if you are doing the steps exactly as shown.
Wrapping It Up
So why would you want this to work? Well, I am not really 100% sure. It can be nice to have the default color show up in search that you want, but as soon as you get a single sale, this will not matter. Amazon shows the best selling color as the default, so a single sale will change it if it is different than the one you wanted to show up. This can still be an easy hack to apply to give you that slight edge over your competitors and stick out in search as soon as your shirt is indexed.


OH MY GOSH If this works I owe you a free t-shirt 😉 Thanks!!!!
Great article!
Awesome post, as usual Thanks! Do you know of any software for speeding up the upload process? For me, the uploading is the most time-consuming process.
I know of a few, but automating uploads is against the Amazon Merch TOS.
Oh didn’t know that 😂😂
where does it say that?
All of your articles are amazing, this is awesome.
Hi Neil, Have a great day!
Thanks so much for posting this “trick” to pick the display color! Yeah!
I sort of figured that out but couldn’t understand why it didn’t work consistently. It’s the youth thing. More often than not I’ll forget to choose it so I make a special effort to try and do that first. Now I know. Thanks.
Bummer. I did the trick for two shirts, meticulously following the directions. In both cases it didn’t work and I ended up with pink default shirts. C’est la vie.
Did you make sure you checked “youth” at the right time?
Yes, I did. I waited until the end. Is it still working for you?
I tested it only 5 times and it worked all 5 times. Pretty small sample size though.
Still no luck, I wonder if it has anything to do with OS or browser (which would be odd, but stranger things have happened). I’m on a Mac using Chrome, FWIW
Same for me, it didn’t work. Glad it works for others, though.
Thanks! Great tip.
That’s what I’m searching for. Thank you, Neil
When listing a shirt, do you prefer to choose the top five colors or do you sometimes to pick the color of the original design and then the top four colors recommended by Amazon? Thanks.
I always pick the colors I think look best with the design.
Is there a trick to getting the men’s shirt to always show. Of late I’ve gotten the women’s T in the worst color! A true double whammy. ugh
Hi Neil! I just was accepted two days ago! I tried to upload the first design but I did not change the display color and I did not pick up sizes. I even did nor see the option to pick up sizes… Can I edit this my design and chose another color or it’ s already late? May you tell how many colors and sizes I should pick up ? Thank you for your answer. And I’ m going to upgrade MI too!!!
I actually am not sure if this works anymore! Was a short run but I need to test it some more.
The method doesn’t seem to be working anymore, and no such luck with the premium selection.
This did not work for me, I tried several times, I had a green shirt and the image always displayed orange no matter how many times I tried to make green 1st
Unfortunately, this is not working anymore!
This doesn’t work for me. As long as I pick black as one of the colors, black will be the default. If I want a color besides black to be the default, I can’t select black at all.
Can you change it after the product has gone live?
Unfortunately, this trick no longer works.