Creating A Customized Shop on Spreadshirt

More and more designers and entrepreneurs are turning to Spreadshirt as a fantastic side hustle. With the right direction and optimization, these creatives are quickly turning their passive source of income into their main occupation! Having your own Spreadshop and running it properly can so here’s everything you need to know about:
Creating a Customized Shop on Spreadshirt. A customized Spreadshirt shop is referred to as a Spreadshop and it is separate from their Marketplace since you get to have your own website and set your own prices but still have the benefit of Spreashirts print-on-demand and product creation technology.
Creating a custom Spreashdop is an easy, fun, and effective way to start a new side hustle and make some serious money. The best part is that you really don’t have to be a graphic design expert because most of the top Spreadshop sellers have simple word-based designs that are hyper niche specific. Read below to learn more about customizing a shop on Spreadshirt.
How Do I Create a Spreadshop? Can I Customize the Shop Layout?
Spreadshirt has made it extremely easy and straightforward to create a Spreadhsop. But before we get into how to create one let’s quickly differentiate between the two selling capabilities offered by Spreadshirt.
If you click the “Start Selling” button on the Spreadshirt homepage you’ll see two options to get you started.
![]()
The first is the Marketplace which is a location on Spreadshirt where you can sell your unique designs to hundreds of thousands of daily visitors.
However, in this model, you don’t own your own website and Spreadshirt gets to decide your pricing. Still, you get to use their print-on-demand technology and large audience which is a huge plus!
The second option is the Open Your Own Spreadhsop button.
Here, you get to use Spreadshirt’s easy-to-navigate merchandise and product design tools as well as their print-on-demand services but with the added benefit that you have your own website and set your own prices.
If you decide to open your own Spreadshop here’s what to do:
- You can follow the steps above and go through Spreadshirt.com or just head on over to Spreadshop.com directly.
- Click the “Open a Spreadhsop” button found all over the page to get you started.
- Fill out your shop name, email, and password then hit “Get Started Now”.
- You will now see what is referred to as the “Partner Area” and on the left tab, you can click on “Designs” to upload up to 25 designs at once.
- Once uploaded, you will have to select specific products that you want your designs to be placed on.
- Click the “Edit” icon which will reveal several best seller products with your design already on them. Go ahead and remove the ones you don’t want and click “Add Products” to grow your catalog.
- Once you’ve chosen your products, you can manage the size and location of your design as well as the default colors you’ll offer and you can deselect the colors you will not be selling.
- Hit “Apply Changes” when done. You will have to do this for every product. While this may seem time-consuming it will actually increase your conversion rate and sales so it’s definitely worth doing.
- You can also save your edits as templates so the next time you upload a design you can just apply it automatically to your product templates.
- When you’re happy with everything click “Done” and then fill out your design name, description, and tags for search rankings.
Now that you have your designs ready, you can start customizing your Spreadhsop. And yes it’s possible! Simply:
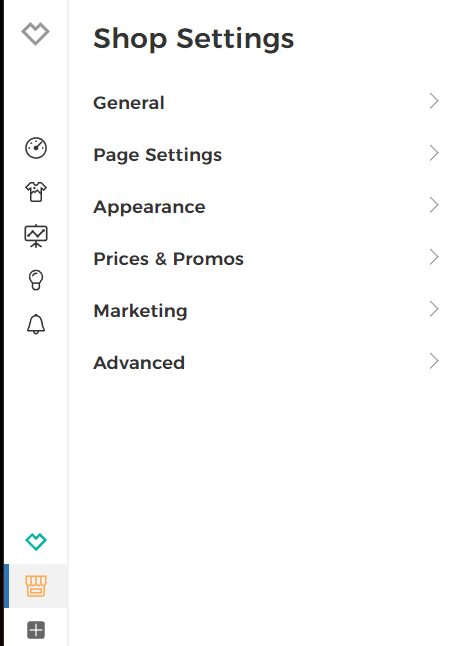
- Go to “Shop Settings” in the “Partner Area”.
- You’ll see various details that you can add and change including your contact information.
- Select “Page Settings” if you really want to start customizing!
- Here you can change everything from your header to your about section, product view, layout, and so much more!
- On the product list page, you can change how many products you want to show per page as well as filer by color, product name, price, etc…
- You can edit individual product details including the individual product page design.
- In the logo section add your logo, a favicon, and even have an invoice logo.
- We definitely recommend editing your colors and fonts.
- You can also change your shop’s theme and choose the models you want to have wearing your clothes.
- Finally, in the “Shop Prices” section you get to decide your product prices and margins.
There’s a lot you can do to customize your Spreadhsop, sure it’s not completely flexible but it’s a fairly sophisticated model that’s perfect for print-on-demand!
Does Spreadshirt Offer White Label Shops?

Yes absolutely, it’s their standard.
They don’t include their logo or anything so you can create your shop the way you want.
You’ll only notice either name at the footer where it says “Powered by Spreadshirt” but for directions on how to remove that go here.
How Do I Integrate the Shop With My Website?
Anyone asking this question is most likely using WordPress because otherwise if you knew how to code your own website you’d know how to integrate it with your website.
However, if you don’t know basic HTML then you can easily integrate your Spreadshop with WordPress using a WordPress plugin found here.
It’s a fairly simple process we’ve outlined below:
- Start with a new website where your Spreadshop will be in the Blog.
- Install the Zip File within your WordPress PlugIn Section then activate the plugin.
- You’ll have to enter the required information as well as the URL of your newly created page.
- Finally, enter your URL into the Advanced Settings in the Shop Admin.
Creating a Spreadhsop is a fantastic way to make some extra money. However, if you’re serious about making print-on-demand your main source of incoming while working from anywhere then you need to get in touch with us today! We will help you accelerate your growth on Spreadshop as the all-in-one Spreadshirt tool. Contact us today to learn more.