Launching Your First Amazon Advertising Campaign (Sponsored Products)
Once you are accepted into AMS (Amazon Marketing Services), you are probably ready to jump in, set up some ads, and make thousands!
However, you quickly realize that AMS rebranded within days of it going live for Merch by Amazon into “Amazon Advertising”. Then, unless you are very familiar with running ads online, you might be getting in over your head before you begin.
Which is exactly why I want to write this post. I want to try and attempt to help save you as much headache as possible, make sure you do not flush your money down the drain, and have a solid understanding of how the platform works (and what all those weird words mean), before you get your first ad up and running.
Launching Your First AMS Campaign
When you first log in to Amazon Advertising, you see this little screen staring at you:
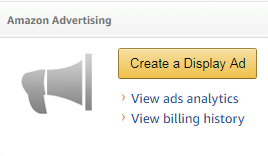
There are a few more options in the top menu, but other than that, the page is pretty bare. You will want to click on this to launch your first campaign.
Note: Before you do this, it is advised to click your name/brand in the top menu, click on Payment Settings, and enter in a card so your account is billable.
Once you click on the “Create a Display Ad”, you will be presented with three options.
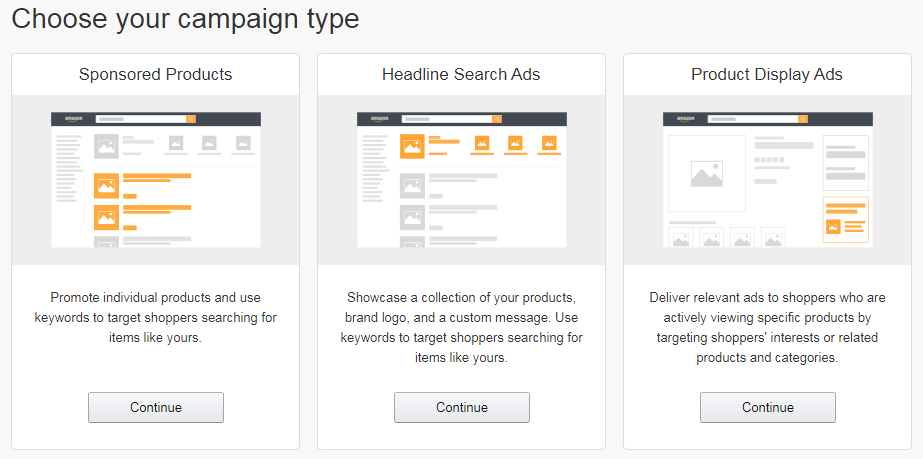
You have 3 options:
- Sponsored Products
- Headline Search Ads
- Product Display Ads
This will be part 1 of a 3 part series where we go over each campaign type. Today, we will be going over how to launch a sponsored products ad inside of Amazon advertising.
Sponsored Products
We are going to start out this series on Amazon Advertising with sponsored products for one simple reason. These are the easiest ads to get up and running, and are one of the easiest to “get right” where you are both making money, and understanding the advertising process.
Putting it simply, sponsored products are going to allow you promote your shirts for specific keywords in search. They will make your shirt show up FIRST or in the first few results (depending on your bid which we will get to later).
This is incredibly important because this allows you to
- Target customers based on keywords
- Grab customer interest FIRST
At the end of the day, Amazon is nothing more than a search engine. The higher you rank in that search engine, the more traffic you will receive organically.
Sponsored products allow you to pay for this position, and thus bring in that traffic.
To put this in perspective, another massive search engine is Google. Here is how position on the page, relates to traffic:
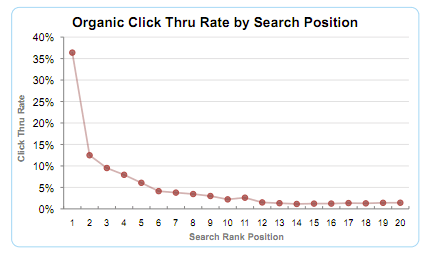
If you are not the type to really like graphs or understand what you are looking at, let me help you break it down. On the Y axis (up and down), you see Click Through Rate, which is often represented by “CTR”. This represents what percentage of people actually click the listing after they search.
As you can see from the image, when you rank number 1 in google, over 35% of everyone who searches for a specific keyword, will click on the number 1 result.
On the X axis (left and right), you can see the search rank position. The further you rank away from the number 1 position, the less CTR (click through rate), or traffic you will receive.
This does not 100% line up to Amazon data, but with them both being Search Engines, the data makes it clear. Ranking first gives you a HUGE advantage.
The SAME advantage that sponsored products give you!
Alright, now that you know why we are starting with Sponsored Products, and you understand what CTR is, let’s talk about actually launching a campaign.
Creating A Sponsored Products Campaign (Automatic Targeting)
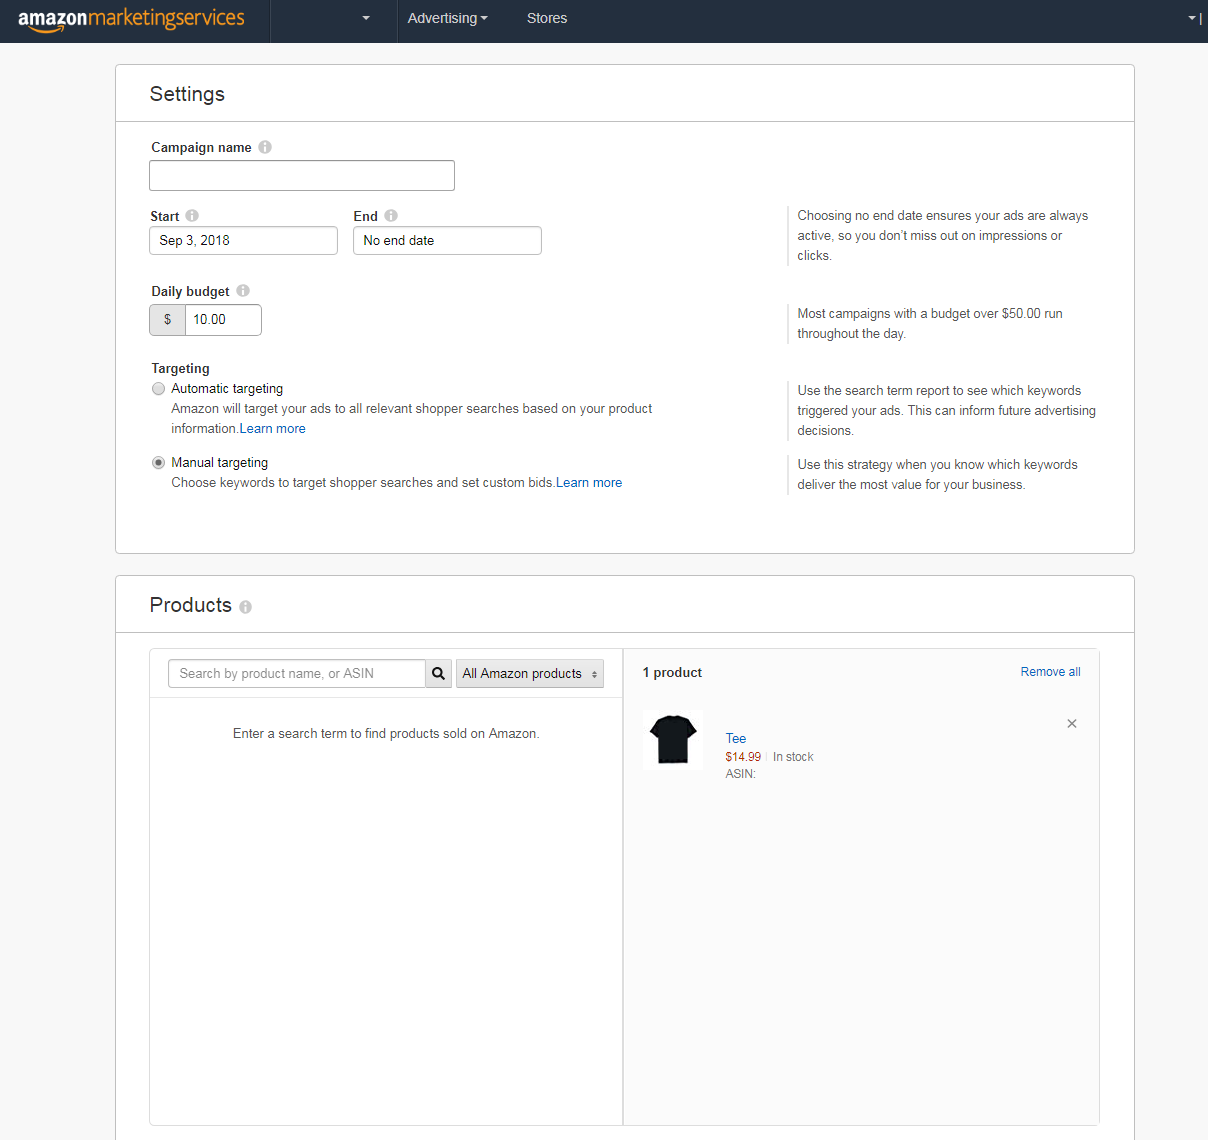
After you select sponsored products, you will be presented with the create campaign settings.
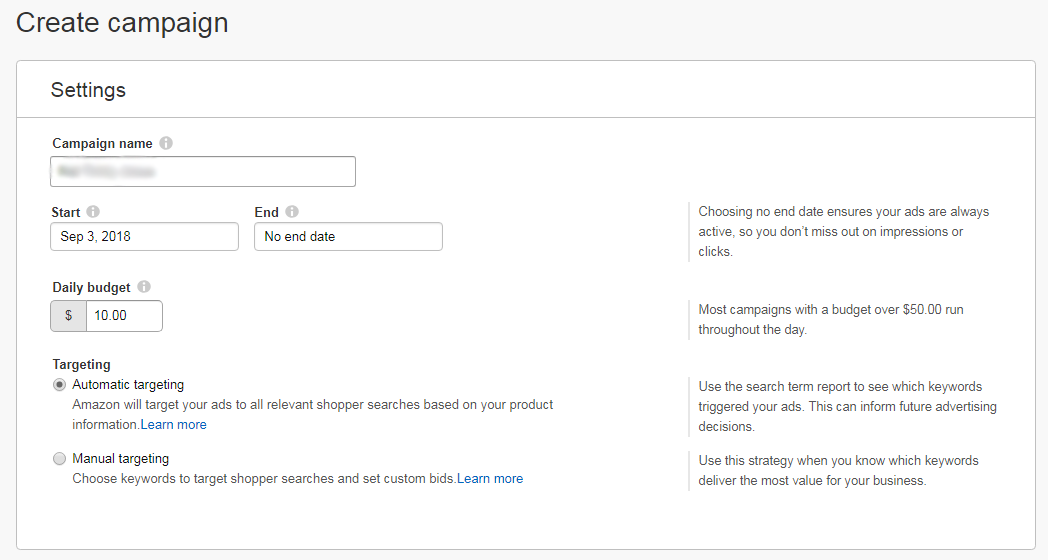
This page is pretty straight forward but lets walk through it.
Campaign Name: This is pretty straight forward. You are setting up and ad, and it needs a name. If you plan on running multiple campaigns per shirt to test, you will want to name this something specific so you know exactly which campaign this is. Remember, this campaign is only visible to you (not potential customers).
Start and End: SET AN END DATE. Let me repeat that again… Set an end date. This is incredibly important. Set what day you want it to start, and when you want it to end. By default, this will be set on “no end date”. There is literally nothing worse than waking up a week later, or a month later and realizing you have spent $3,000 in ads because you forgot to set an end date. I would know =/. To start with, let you campaign run about 24-48 hours from when you are launching it.
Daily Budget: The daily budget is a little bit tricky. I typically TEST with 5-10 dollars a day budget in order to dial in a campaign. However, if you read the little tool tip inside of Amazon advertising, it will tell you: “Your budget puts a limit on how much you will spend for this campaign. Your daily budget is the amount you are willing to spend on a campaign averaged over a month. You can always change your budget later.”. This is important because it tells you that this daily budget is misleading. It tells you that this is actually averaged out. Meaning if you set a 10 dollar budget but it only spends 5 dollars the first day, it might spend 15 dollars the next day. This is another reason I like to set a start and end date, so you can easily do the math on how much you are willing to spend.
- Note: Amazon has said they recommend $75 dollars a day as a daily budget. This is TERRIBLE advice and if an Amazon employee is reading this, I urge you to change it. Never set your daily budget anywhere over $10-20 a day unless you are done with your testing and you are ramping up your campaigns. This is hands down the easiest way to give Amazon money without getting anything in return because you have not properly tested.
Targeting: You have two options here. There is automatic targeting where Amazon will target your ads to all relevant shopper searches based on your product information, and there is Manual targeting where you can choose keywords to target shopper searches and set custom bids. We are going to go over both in this article, but do yourself a favor and select automatic targeting to START WITH. I will explain the technique further down in this article.
- Note: Make damn sure you have not keyword stuffed your product listing. This option is going to pull keywords from your listing and run variations of them for your ads. If you keyword stuffed your listing, not only is that going to run your ads to the wrong keywords, but you will end up wasting money. Make good listings first and foremost, THEN run ads.
Products:
The next box you will see is for products.
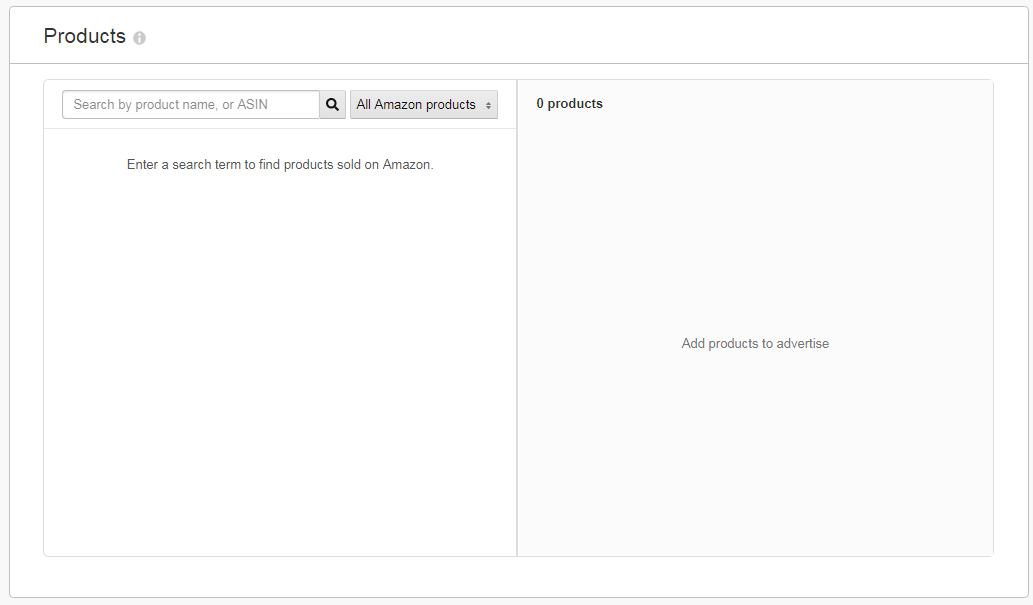
You can add more than one product per campaign, but I would highly suggest you use only a single product per campaign. This makes testing a LOT easier.
You will see there is a place to enter a product name or ASIN.
There are two different ASIN structures for Merch by Amazon products. You can typically open up the product from your dashboard and look at the URL. It will typically look like Amazon.com/name of the shirt/dp/ASINHERE.
You can usually copy and paste the asin into the above box, click on search, and it will show up.
If you uploaded the shirt before they changed their ASIN structure, you May see something like this:
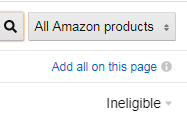
If this happens, you simply need to go to the product page of that product you want to advertise, click on a gender and then a size, and THEN grab the ASIN from the URL.
Click on Add product which will move the shirt to the right hand column. Then all you need to do is set your bidding below.
Bidding: Simply put, your bid number should be the amount that you want to pay PER CLICK that your ad gets. Amazon will give you a default bid and give you a suggest bid.
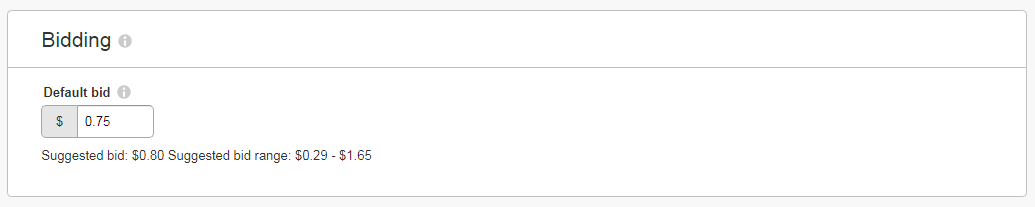
There are multiple schools of thought on this. The first is just to go with the suggest bid range and then monitor the campaign. The HIGHER the default bid, the more you will win out against other ads.
Think of this as an auction. You are competing for the same spot with everyone else running AMS for similar keywords. The higher you bid, the more often you will get displayed. However, you will only pay directly above what your competition pays if your bid is higher until your ad spend runs out.
Example: Say you and your competition are both running ads to the keyword “dog t-shirt”. Your competitor sets a default bid of $0.75. You set a default bid of $1.00. Both of you have a budget of $10 per day. You end up winning the auction and your ad is displayed first, yet every click you get, you do not pay $1.00. You actually end up paying around $0.76. Once your $10 ad spend runs out, then your competitor’s ads start displaying.
Setting a high bid does not mean you will pay that much, it is just that you are willing to pay that much per click. This is a great way to quickly test the market, but also might cost you more.
The second school of thought is to set a super low default bid. Think 20 cents and below.
What this does, is that you will not get nearly as much traffic, but you will basically run out the ad spend of everyone else, and slowly trickle in your own traffic to your listings. This is a LOT slower, but can be used to see if your ads are effective or not. It really depends on how many campaigns you are running and how fast you want to see results.
Since I am testing a campaign, I generally set my default bid right in the middle of the suggested bid range. Remember though, I only have my campaign run for 24-48 hours so I can keep an eye on what is happening and what the CPC ends up being.
Note: CPC stands for “cost per click” and is what you are targeting with your bid.
All that is left is to finally launch your campaign. Click on the button and you will receive the message your campaign was successfully launched:
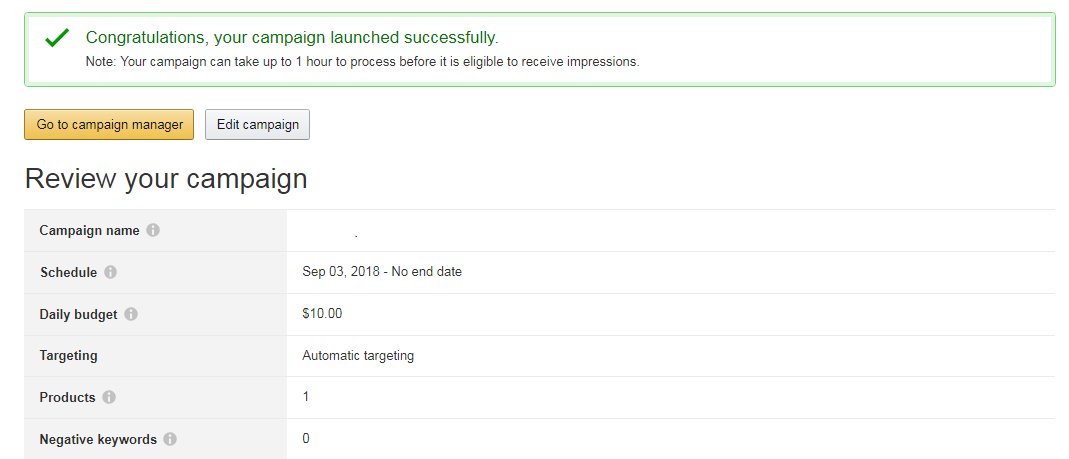
Make sure you read what they note, which is that the campaigns can take an hour to process before they can be eligible to receive impressions.
What they do not say though is that Amazon Advertising is a new platform and there may be lags of up to 3 days in reporting. Anyone who has been using this system long enough knows that this sometime happens. We have to roll with the punches for now! Thankfully, my campaign began quickly.
The Campaign Manager
The campaign manager is where you will see all your metrics, active campaigns, and be able to tweak things such as end dates, budgets, and see how well your ads are doing in general.
Right after you launch a campaign, you can click on the “go to campaign manager” yellow button and it will take you there. However, it will pretty useless to you until your ad starts running and they start displaying all the juicy data.

As you can see, it will show the campaign, that it is active, and that it is a sponsored product. As this was an older campaign, I didn’t set an end date (as I was going to monitor and close it out the next day). You can also see that there is no spend, sales, or ACoS displayed as the campaign had JUST launched.
You can actually click on the campaign name, which will bring you into the screen you will probably spend a good chunk of time in (once your ads start running)
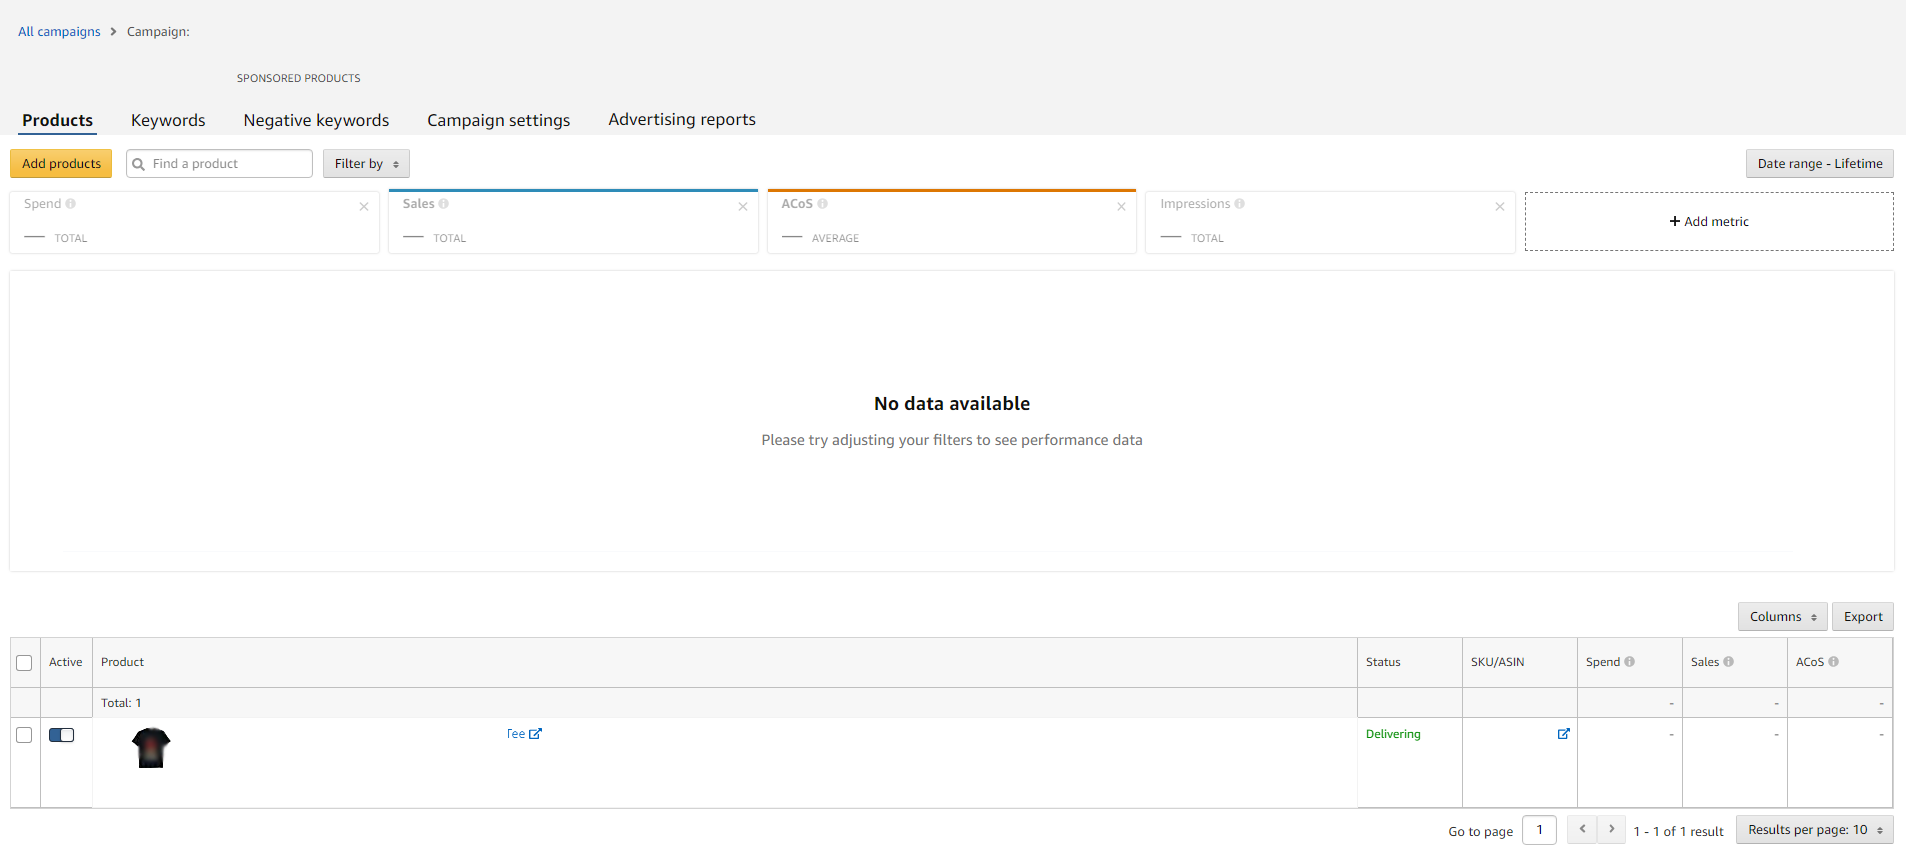
This is going to show you the products you are running, but the important parts are at the time. This will show you the spend, sales, ACoS, impressions, and let you see keywords, negative keywords, campaign settings, and advertising reports. We will revisit this!
Creating A Sponsored Products Campaign (Manual Targeting)
While the other campaign is left to start running, I thought I would take the time to talk about manual targeting. This is very similar, but involves a bit more work by yourself, and some more understanding of specific terms. I want to walk everyone through that.
Go back to the main page, select start a new campaign, and then fill in your details.
As you can see, I have done pretty much the same campaign, except I have picked manual targeting. This is going to allow me to add specific keywords. I also only picked a single shirt for this campaign.
After you have entered in a daily budget and picked out your product to run an ad to, this is where things change. You will now need to upload keywords.
Before you do that though, you will set a bid. This works the same as above, I would pick something right in the middle of the suggested bid range, but the technique is going to change depending on your tests.
Note: You are going to see a new checkbox called “Bid+”. I would HIGHLY suggest not ticking this box as this is going to pretty much just spend more of your hard earned money.
Bid+ increases the opportunity for your ads to show in the top of search results. When Bid+ is turned on, Amazon will increase the bids for your eligible ads.
Now that you have a default keyword bid in there, it is time to actually ad some keywords!
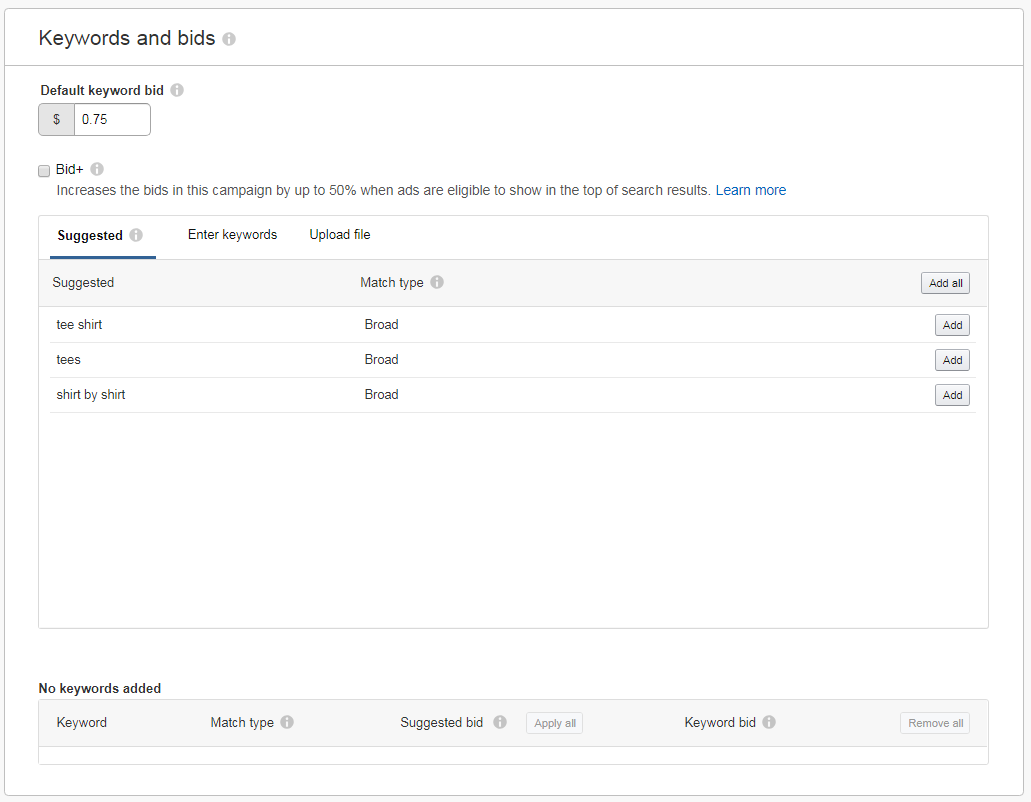
You will see 3 little tabs in this screen. Suggested, enter keywords, and upload file.
As you can see from the screenshot above, their suggested keywords are almost always as bad as they can get. I would suggest NOT adding these, but instead clicking on the “Enter Keywords” tab.
You can enter up to 1000 keywords on this page, but first, you see a drop down that says “Match Type”. This is incredible important to understand.
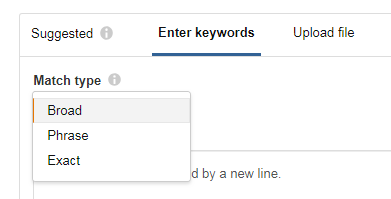
Broad, Phrase, and Exact are going to act very differently when you are running ads.
Broad Match: This setting will allow someone to see your ad if a customer searches for that specific keyword as well as a variation of it. A good example of this is we have the keyword “autism apparel” added but if a customer typed in “buy autism apparel” the ad would still show up.
Phrase Match: This is a very similar modifier to broad match where they will show the ad based on the searches that directly match the phrase or are very close variations of a phrase. It also allows addition words before or after.
Exact Match: These ads are going to be shown for searches that are EXACTLY the keyword you added as well as very close variations (such as a reordering of words but the meaning stays the same). These are great if you know exactly what you want your ad to show up for but when testing, you will want to stick with broad match.
If you are confused on which one to pick, it really depends on what you are going for. I was reading something that our friend Matt Sheeran emailed out the other day and thought this might clarify things and puts it into perspective:
These different match types are not equal. Someone searching for an exact long tail keyword is further along in the buying process. While you’ll get less clicks and less impressions, they are more likely to buy. Therefore when bidding on these different match types, you should not be bidding equally for each type.
.50 cpc on a broad match type is not going to convert the same way as a well targeted exact match. But those broad matches will have way more impressions, because the factors for them to be shown are way wider.
This is why I tier bids. Broad match is the widest portion of the funnel, so they have the lowest cpc. Phrase match is closer in the buying process, and deeper in the funnel so it would be slightly higher. And then Exact match is the closest to a buyer clicking that buy now button, so I would bid the most for those. ~Merch News Email Newsletter
I typically START the ad process using auto campaigns. However, once I am further along, I will then use broad match, and dial down from there.
Next, you will have the option to enter in some negative keywords.
Negative keywords
Negative keywords prevent your ads from displaying when a shopper’s search terms match your negative keywords. You can exclude irrelevant searches, reducing your advertising cost.
There are two different match types for negative keywords, negative phrase and negative exact:
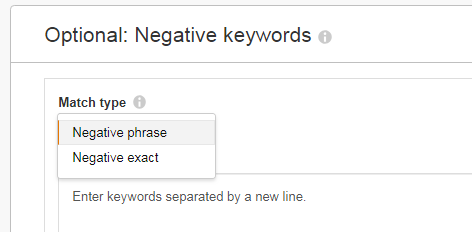
Negative Phrase: This is an advanced technique that I may go over at the end of this article. Essentially, if you put in a negative phrase, ads will show on searches without this term.
Negative Exact: This is an advanced technique that I went over in the ultimate amazon advertising guide here. Essentially, if you put in a negative exact keyword, ads will show on searches without this term. This is VERY powerful stuff if you understand the impact these can have on your campaign.
Note: Campaigns typically do best with 30+ keywords added.
Once you have all those sections figured out, you are now ready to launch! As you can see, I have added 16 keywords as a test only to see what happens. I kept the keyword bid at the suggested rate:
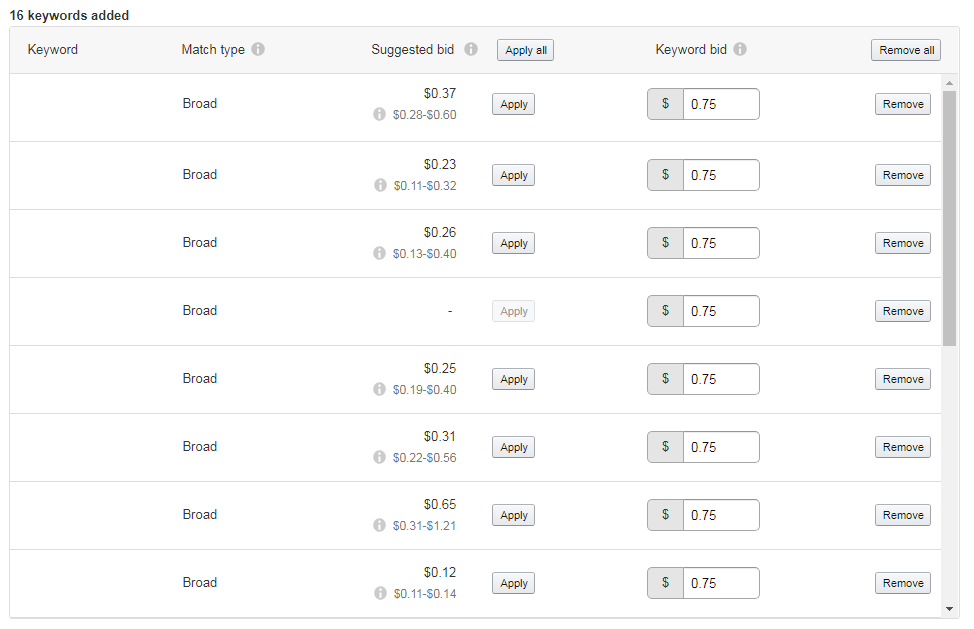
After that, you are ready to launch your campaign.
Where do I get keywords to put in my ads?
This is probably the easiest part of the entire equation.
You want to run ads to keywords that are known to convert and lead to sales right? After all, the point of running these ads is to put your designs in front of the line for potential customers.
It just so happens that Merch Informer gives you ALL of this information in every single search for the Product Search and Merch Hunter.
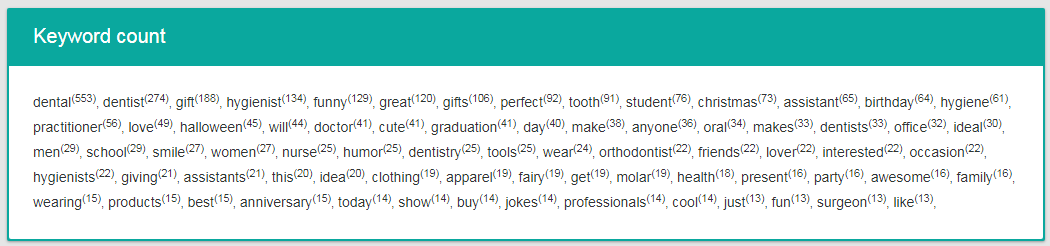
You can use these keywords which are proven to get traction and are proven sellers and string them into multiple word phrases that you can then run broad ads to. Incredibly easy!
Reading Your Stats (Doing the Math)
This is very important, so do not glance over this section. If you are unaware of how to do simple math, you are going to end up losing a bunch of money.
Your ads should start displaying information in a day or two after you start running them. They say 12 hours, but from my tests, this is a bit hit or miss.
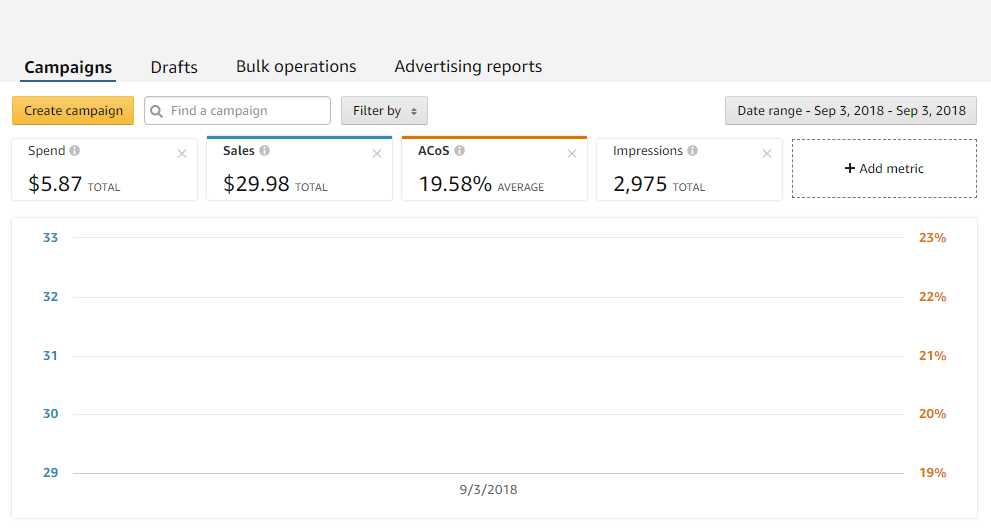
Here are the results of my auto campaign. As you can see, I spent $5.87 and had sales of $29.98.
Quickly looking at these numbers, you can see that I made two sales at $14.99. This leads to an ACoS of 19.58% after almost 3,000 impressions.
This might seem good, but take a step back and do the math. ACoS stands for “advertising cost of sales” and just so happens to be calculated on REVENUE not profit. Remember that we are paid a royalty on each sale, we are not getting the full price of the shirt.
At $14.99, this means I made $1.60 per sale, leading to a total of $3.20 in royalties for $5.87 spent. This means I LOST MONEY. However, this is not a bad thing necessarily. This just means that I need to tweak the campaign a bit.
Update: Since running this campaign, and launching this article, after I turned OFF AMS ads, I have sold 7 of these organically.
Adverting Reports (Tweaking Your Campaigns)
The reason I tell everyone that wants to try out ads to run auto campaigns, is that they will give you a good starting point to tweak from there. You might lose money like I did, or you may not. Whichever happens, you can learn from it, and move forward.
Do NOT expect to launch an ad and never look at it again. These things require constantly monitoring.
At the top of your campaign manager, you can see “advertising reports”. If you are going to be running AMS ads, you are going to spend a lot of time inside this aspect of Amazon advertising. It lets you actually pull back reports of how everything is doing.
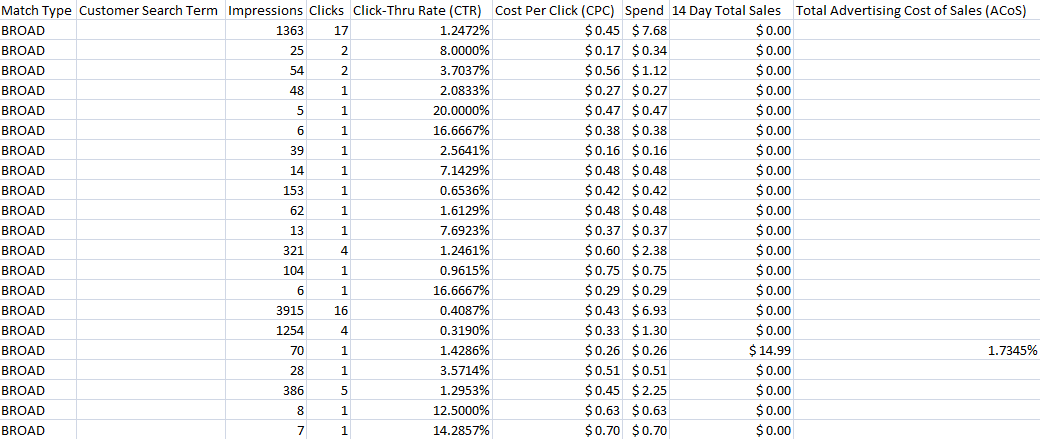
Take a look at part of the report here.
You can see that all the keywords I put in where broad, they all got an amount of impressions and clicks, and you can see how much was spent over a few days.
HOWEVER, all of those clicks and impressions mean nothing for most of these because I did not get any sales. I did make a sale based on this campaigns data, and as you can see, it got 70 impressions, 1 click, and 1 sale. It cost me a whopping 26 cents to make a sale. 26 cents to make 1.60 (which you can play with pricing as your shirt gets more popular.
This leads to an ACoS of 1.7345%. This is what I am talking about!
Since this was an auto campaign, I actually learned a lot from it even though I ended up losing money. I learned a bunch of keywords that I should NOT run ads to, but 1 keyword that I can set a low bid to, run for a long time, and should turn a profit on (When you launch a new manual campaign with this keyword). This technique has been very popular with Merchers in the past. Lots of campaigns with very low bids, just to trickle the traffic to your listings. THIS technique I showed you above though, is exactly how you find the keywords that convert, and ditch the ones that do not.
Wrapping It Up
That about wraps it up for launching sponsored products. If you are serious about making money on the platform, then this can almost be considered a magic bullet. That is a big IF you are willing to put in the effort. If you are not willing to actually look at the data, and test different things, then this is not for you.
If you want to put your amazing designs (and yes, they have to be great to do well), in front of everyone else, as well as put in the work of split testing different campaigns and losing a bit of money along the way to figure out the profitable campaigns, then this IS for you.
If you have any questions or concerns, drop them in the comments below!
Good luck!
Thanks Neil! Great blog post as always. What type of sponsored ads have you had more success with, manual or automatic? Thx
Starting with automatic. Then grabbing keywords from these campaigns that have done well and running manual campaigns with low bids.
Where or how do we get the report after auto campaigns that shows the keywords they targeted? I have downloaded a couple different reports, and they didn’t show me the keywords.
Click on advertising reports, and then run a “search term” report: https://gyazo.com/b234e4d61b365dbf04bcb8c53a541346
Nothing Works the way you just described it ????
What does not work like I described it?
I have the same problem – And that what Neil is suggesting here with his reply doesnt help as well – i have no data at all just blank template page thats it ????
Any help please and Thank You
Neil – how hard is it to get accepted for AMS now a days? Thanks a lot!
As soon as it opens up in your dashboard incredibly easy. Once you see the code at the bottom of the screen inside of Merch, simply follow the instructions.
Hi Neil, how long is it take you to get approved? I am waiting for two weeks already. Tried to contact AMS and Amazon Vendor Teams – their response: “In order to assist you more effectively, we need more time to research your issue”
Reapply again if it has been longer than 3 days. Most people are getting approved in as little as 24 hours.
Thanks for a great article. Do you think the power of ads will be lost as so many Merchers now have access to them?
Not at all. Everyone has access to Facebook ads, but it takes a LOT of testing to get them right and profitable. The same goes for AMS.
Thanks, Neil, for a great article. Regarding Broad Match, I think I am right in saying that the “autism apparel” example you give is a Phrase Match, a Broad Match can have words splitting the keyword “autism sports apparel” or can just be related words “autistic spectrum”. Time to test my first ads 🙂
Yep! Take a look at this which explains it a bit better: https://support.google.com/google-ads/answer/2497828?hl=en
Thanks again Neil. When you download the advertising report what are the main metrics you are looking for?
I am going to be looking at essentially what I put in the screenshot. I want to see what keywords are actually getting impressions, but I also want to see what I am paying per click on all of those keywords. I may have a lot of impressions but am paying a high CPC that is not converting. I do not want those keywords in my manual campaigns. Finally looking at spend and sales. The idea is to find keywords that actually DO get some sort of impressions each day, that have a low CPC and actually lead to sales.
Thank you for your generosity Neil. You are always giving us so many valuable resources without charging us extra money.
Thanks for the post! When choosing keywords for a manual campaign, should they all have some version of “shirt” at the end?
Not all the time. This is why I run an auto campaign first, and see what keywords are being used before I start a manual campaign.
I’m no longer seeing “Sponsored Products” as an available option. Thought they got rid of those. The only current campaign type options available to me are; “Sponsored Brands (formerly Headline Search Ads),” and “Product Display Ads.” Any thoughts?
Are you using an old account? You may need to reapply with the code they gave you inside of your Merch Dashboard.
The Prince of Merch!
Great article. AMS seems very similar to adwords. Have to pay for the data and optimize accordingly. If one was willing to put in a budget of 500-1000 dollars how much ROI do you think can be attained from that? Thanks again in advance.
It is very similar. There is no way to determine the ROI without knowing your product and customer demand for keywords related to that product. You could make 1,000% ROI or you could spend 1,000 dollars and not make a single sale. This is why small tests are so important.
Thanks for the response. In that case how much was your average ROI while you were testing out AMS? How many small tests do you conduct/would recommend before you turn it into something successful?
I don’t have the option to do sponsored ads! I only have the other 2, shown here: http://prntscr.com/kuwbjo
Have others been updated similarly or is it something with my account? Does anyone know a fix?
I have the same problem.
Hi Neil! Great article. Question, though. On my dashboard when I’m asked to choose a campaign type there are only 2 options: “Sponsored Brands (formerly Headline Search Ads)” and “Product Display Ads”. I’m not seeing any option for “Sponsored Products”.
What am I missing? Or is what I’m seeing part of some rollover into the new Amazon Advertising platform? Thanks for any help you can provide!
If this was an older account, you may want to reapply with the code inside of your Merch dashboard. If you still do not have sponsored products, I would reach out to the AMS team.
Thank you! I do have an older account. So would I reapply with my code and a different email address?
I believe so, yes.
Thank you, Neil – I put in a support request and they just added Sponsored Products to my account – yay!
Thanks for the awesome post, Neil.
I had my AMS set it up a couple of years back as Vendor Express and use for selling Physical product on Amazon. Now with Merch, there’re only Headline Search Ads and Product Display Ads available, not the Sponsored Products.
Do you have any advice on how to get all 3 options available? Currently don’t see invite code available on the buttom of my merch account.
You will need to wait until your Merch account has the invite code, and then open up a new Amazon advertising account I think.
Hi Neil! What type of t-shirt that was ? I mean evergreen or occasion or other.
I tried to run trend shirt spent $20 on automat and get no one sale. I had several organical sales of this shirt before.
What kind of shirts do you think is better for advertising?
In the past I have focused on ads just for trending/holiday niches. This niche that I got the sales on was an evergreen design.
hey neil, how do i get a ams acc?
Apply once the unique code opens up in your Merch account.
Thanks Neil for the article is great!
Thanks for the great article Neil!
My ad report contains search terms in codes like “b076b8w443”. Is this normal? Also, how much do you usually test with auto campaign before moving on to manual?
I usually test for a few days. Yes, that is normal. That is the ASIN of a shirt that someone saw your ad on, and clicked off that ASIN to come to yours.
Hi Neil:
I notice that some days do not appear the products of “Merch by Amazon” on Amazon.com (as if they did not exist) and then after 1 or 2 days they reappear. Do you know why this happens?
Thanks for your answer.
If you are not seeing results, log in to your Amazon account and update your primary shipping address to a USA address.
Great post. Appreciate an appraoch that will actually yield results when done right. I have followed the directions for an automatic campaign and set them up. The campigns have been stuck in pending review status. Is this normal? How long does it typically take for them to go live.
They should go live right away. If they are under review, then it may take a day or so.
Hi Neil,
Many thanks for this article – very informative. I have a question concerning the budget: If I run a campaign for two days with a daily budget of 10 $ and at the end it says that I have only spent 0.40 $ does it mean that my ad/product just doesn’t appeal to the users. Therefore there was no chance to make use of said budget? And one other question: When one of your ad is suspended does it have a negative impact on your account, like getting a design rejected on merch? Thanks a lot in advance!
No, it might just mean that your bid might be too low. I would let it run for a while and see what happens. If an ad gets suspended, it will not have a negative impact on the account, just that there is something wrong and you will need to work out what that is.
Thank you, Neil! Much appreciated!
Thanks Neil , you really did so great in this article , so much important points , headlights , and its so great effort of you , thanks again
Thanks for the info. I started 3 campaigns and impressions are showing. These are the shirts that are selling already even before ads. What would be a good impression/click/sale ratio?
Thanks 🙂
Hey Neil! First, thank you for this article, it’s helped me launch my first AMS ads! WOOOHOO!! I do have a question or two if you have a minute.
My ad performance: 6 click 4 sales. Herein lies the issue, I’m getting one or two clicks and one sale, CPC is about 40 cents. My budget is $5/day and I’m not getting close to that. Any strategy for getting more clicks? Raising my budget shouldn’t do anything right?
Second, will adding the same shirt to another ad put myself in competition with myself, causing a higher cost per click?
Those are my two questions right now… Just getting into AMS and seeing a nice rate of purchase upon clicks is promising, now I need to learn to maximize this!
Thanks a million!
– Andrew
Nice work! If it is not spending much, look at the reports and at the keywords that are being used. You may need to run a manual campaign and add more keywords.
No, it shouldn’t cause any increased CPC if you put your shirt in another ad at all!
Hi, Neil, I set up a campaign yesterday and I logged in right now to check it out and my shirts say “Delivering” does that mean its processing?
That means that your ads are currently running.
Hi Neil.
Question: When choosing keywords in AMS, are they as strict on trademarked terms similarly to how it is when writing our product details and artwork on MBA? For example, lets say im advertising one of my own original MBA shirts with untrademarked artwork and/or typography; on ams, could I mention a relative celebrety name or brand name in the targeted keywords that may attract a similar following that would like my artwork seeing as this doesn’t specifically show on the MBA product listing; or is this not allowed??
I have not tried, but best practice would be to NOT do that. No reason to really tow a the grey line if yo do not have to. Who knows what changes they will make in the future.
Hiii neil great blog and great details i want to ask if you are promting 5 tshirt is the budget the same as 10 tshirt or you have to spend more? thank you
It will only spend as much money as the daily budget on that campaign.
From other articles on merchinformer it was my understanding that it was encouraged to use the “brand” field for additional keywords and not really even treat it as a “brand name.”
However, as I’m looking into signing up for the sponsored adds (I got a MERCH-xxxx code, yeah!), it looks like you have to apply PER BRAND. If I’ve created a bunch of shirts with no attempt at even creating a brand name, but rather using that field for keywords, it seems like this prevents me from using the Amazon advertising.
Thoughts?
I came across this same issue. All I did when I signed up for AMS is used my full name name as I have it on my MBA Settings Instead of an actual brand as I currently do not have one established yet and got accepted within 24 hrs. Hope I understood your question correctly. 🙂